

This AI Lets You Turn Yourself Into Movie Characters - So We Tried It as a Family
ON THIS PAGE
Subscribe To Get Weekly Family AI Discoveries
My kids wanted to see me turn into their favorite characters.
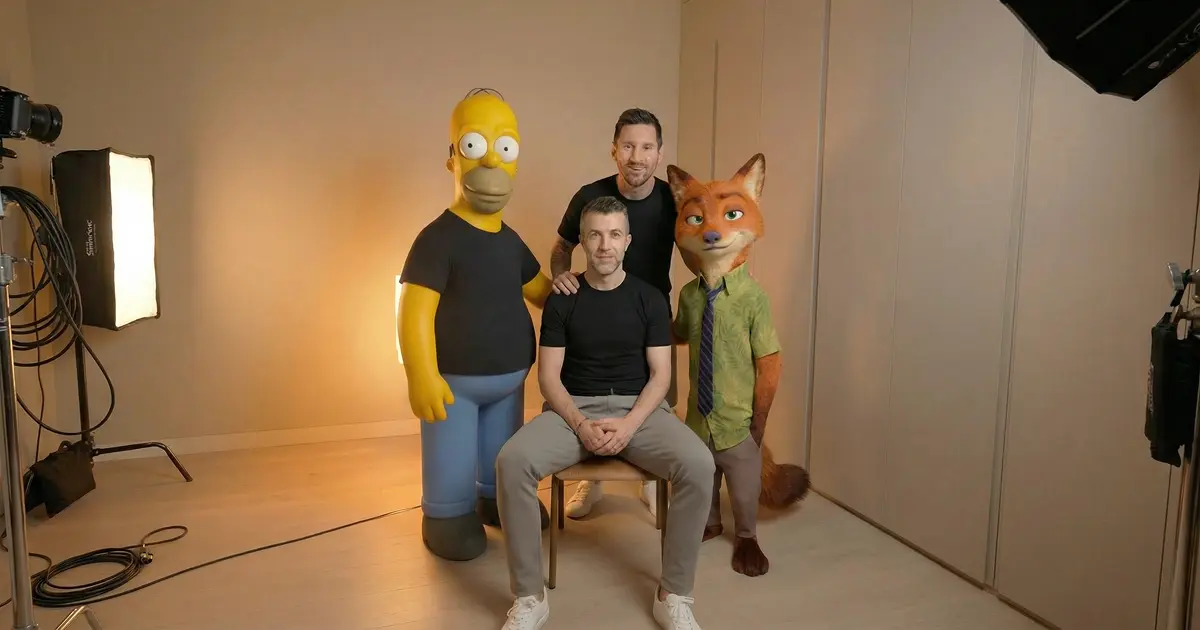
Not cosplay. Not filters. Actual AI transformation where I move exactly like myself but look like Homer Simpson, Mario, Messi, Ronaldo, and Nick Wilde from Zootopia.
Using Kling Motion Control and Nano Banana, I recorded one 8-second video of myself talking. Same chair. Same lighting. Same office. Then I transformed that single video into five different characters.
The kids' reaction when they saw me as Messi? Complete silence for three seconds, then screaming. They watched the full sequence seven times. Asked to watch it again the next morning.
Total cost: 700 Kling credits out of 3,000 monthly allocation. Time invested: 90 minutes first attempt. Kids ages 6 and 8 both completely engaged.
This guide shows you the exact workflow. Which characters worked perfectly. Which ones failed completely. The Home Alone scene that wasted 20 minutes. The Joey from Friends reverse test that technically worked but creatively failed. Everything you need to replicate this with your family.
Quick overview
- Time: 1-2 hours for first project (30-45 minutes once you know the workflow)
- Cost: 700 Kling credits per full project (23% of 3,000 monthly allocation)
- Difficulty: Medium (requires multiple tools but process is straightforward)
- Age range: 6+ years (younger kids love results, older kids can help choose characters)
- Key learning: Use YOUR motion as the source, not the character's motion
- What you'll create: Multiple videos showing you transformed into different characters with your exact movements and timing
What you'll need
Tools:
- Higgsfield with Nano Banana (free tier available, Pro recommended)
- Kling AI Motion Control (approximately 140 credits per character transformation, 3,000 credits monthly)
- Phone or webcam for recording your A-roll video
- Tripod or stable surface (camera must stay completely still)
Time investment:
- A-roll recording and setup: 10-15 minutes
- Character image generation with Nano Banana: 20-30 minutes (5-10 minutes per character)
- Motion Control transformations with Kling: 40-50 minutes (8-10 minutes per character including generation time)
- Review and kid reactions: 10-15 minutes
Your child's input:
- Character selection (which characters to transform you into)
- Watching the A-roll recording session
- Reacting to final transformations (this is the best part)
Parent skills:
- Basic video recording (keep camera still, frame yourself properly)
- Copy-paste prompts into AI tools (no writing required)
- Account management for credit-based services
Optional:
- Video editing software to compile all transformations into one sequence
- Nintendo Switch or game console (adds context if you choose Mario or gaming characters)
Not sure which tool is right for your child?
Take our free 2-minute quiz and get personalized AI tool recommendations based on your child's age and interests.
Step-by-step process
This workflow transforms one source video of you into multiple character transformations. Each character maintains your exact movements, facial expressions, and timing.
Step 1: Record your A-roll video
Set up your phone or webcam on a tripod. Position yourself in frame showing half-body or full-body. Shoulders and arms must be visible for motion tracking.
Record yourself speaking naturally for 8-10 seconds. Stay seated in the same position. Keep the camera completely still.
My setup:
iPhone on tripod
Seated at desk in home office
Natural overhead lighting plus desk lamp
Half-body framing (waist up)
Talking about weekend plans with the kids
8 seconds total duration
Result: One clean video showing consistent lighting, stable framing, clear body movement.
💡 Pro Tip: Record one perfect take and reuse it for all character transformations. This ensures consistency across all outputs.
Step 2: Screenshot the first frame
Play your video and pause on the very first frame. Take a screenshot. This becomes your reference image for character transformations.
Save the screenshot with a clear filename like "dad-original-frame.jpg" for easy access.
Why this matters: Nano Banana needs to see your exact position, lighting, and background to generate characters in the same setting.
Step 3: Generate character images in Nano Banana
Go to Higgsfield and navigate to Nano Banana. Upload your screenshot from Step 2.
For each character, use these prompt structures:
Homer Simpson:
Turn this man into Homer Simpson keeping the exact same background and lighting. Homer should be sitting in the same position wearing his white shirt and blue pants. Cartoon style matching The Simpsons aesthetic.
Mario:
Create a picture of Mario in the same position with the same background and lighting. Red hat with M logo, blue overalls, red shirt, brown mustache. Nintendo game aesthetic.
Messi:
Create a picture of Lionel Messi in the same position with the same background and lighting. Argentina jersey, sitting at the same desk, photorealistic style.
Ronaldo:
Create a picture of Cristiano Ronaldo in the same position with the same background and lighting. Portugal jersey, sitting at the same desk, photorealistic style.
Nick Wilde:
Turn this man into Nick Wilde from Zootopia keeping the exact same background and lighting. Orange fox features, green shirt, purple tie, sitting in the same position. Disney animated style.
Click Generate for each prompt. Review the output. Check that the character sits in your exact position with matching background.
My iterations:
- Homer Simpson: 1 generation (perfect first try)
- Mario: 2 generations (first had wrong hat color)
- Messi: 1 generation (perfect first try)
- Ronaldo: 1 generation (perfect first try)
- Nick Wilde: 2 generations (refined facial features on second attempt)
Download each final image. Name them clearly: "homer.jpg", "mario.jpg", "messi.jpg", "ronaldo.jpg", "nick-wilde.jpg".
💡 Pro Tip: Generate all character images BEFORE moving to Kling Motion Control. Nano Banana iterations are unlimited. Kling charges credits per generation.
Step 4: Apply motion using Kling Motion Control
Go to Kling AI. Navigate to Video tab, then select Motion Control.
For each character transformation:
Upload your original A-roll video (you speaking).
Upload the corresponding character image from Nano Banana.
Add a simple text prompt describing the transformation.
Example prompt for Homer:
Homer Simpson sitting at desk, moving and speaking naturally. Cartoon style with consistent lighting and background.
Settings:
- Camera Control: None
- Duration: Match your original video length (8 seconds for me)
- Quality: Professional
Click Generate. Wait 8-10 minutes per video.
Credits used: Approximately 140 credits per 8-second transformation × 5 characters = 700 credits total (23% of 3,000 monthly allocation)
Download each completed video when ready.
Result: Five separate videos showing you transformed into different characters, all moving with your exact timing and gestures.
Step 5: Show the kids (the best part)
Gather your kids. Show them the original video first so they recognize you.
Then reveal each character transformation one at a time.
My kids' reactions:
- Homer Simpson: Immediate laughter, "That's you!"
- Mario: Excited because we play Mario Kart together (Nintendo Switch from Santa)
- Messi & Ronaldo: Complete silence for three seconds, then screaming. These were the biggest hits.
- Nick Wilde: "How did you become a fox?" Sparked discussion about AI and image generation.
Total viewing count: Seven times on day one. Asked to watch again the next morning.
What worked
Using photorealistic sports stars (Messi and Ronaldo)
Messi and Ronaldo transformations got the strongest reactions from the kids. The photorealistic style combined with recognizable jerseys made instant visual impact.
Kids ages 6 and 8 both recognized the players immediately. The fact that Dad was moving exactly like himself but looked like their heroes created genuine amazement.
Lesson: Choose characters your kids are currently obsessed with. Timing matters. We had just watched soccer highlights together.
Cartoon characters with distinct silhouettes
Homer Simpson and Mario worked perfectly because their visual profiles are instantly recognizable. Yellow skin and bald head for Homer. Red hat with M logo for Mario.
Even with imperfect motion tracking, the character designs are so strong that kids immediately identified them.
Lesson: Start with characters that have simple, iconic visual features. Save complex transformations for later attempts.
Nick Wilde as the parent's favorite
Nick Wilde produced the most realistic transformation. The fox features blended naturally with human proportions. Facial expressions translated perfectly from the original video.
This became a teaching moment about AI combining different visual styles.
Lesson: Animated characters from modern studios (Disney, Pixar) have proportions closer to humans, making transformations smoother.
Consistent lighting and static camera
Recording the A-roll with consistent overhead lighting and a completely still camera meant every character transformation maintained the same environmental look.
Background stayed identical. Desk position matched. Only the character appearance changed.
Lesson: Use a tripod. Keep lighting simple but consistent. This single decision determines success or failure.
What didn't work
Home Alone hair on fire scene (too short)
Tried recreating the iconic moment when the thief's head catches fire. Found a 2-second clip from the movie showing clear panic reaction.
Kling Motion Control rejected it. Error: "Video duration too short. Minimum 3 seconds required."
Time wasted: 20 minutes finding the clip, editing it, attempting upload three times
Lesson: Motion Control needs 3-10 seconds of clean footage. Action scenes from movies rarely provide long enough uncut shots.
Joey from Friends reverse test (directionality matters)
Curiosity experiment: What happens if you use Joey's video as the motion source and your image as the character?
Uploaded a Joey scene. Uploaded a photo of myself. Kling recreated Joey's exact movements on my body.
Result: Technically impressive. Creatively useless. I moved like Joey, not like myself.
Time wasted: 15 minutes plus 140 credits
Lesson: Always use YOUR motion as the source. Transform the appearance, not the movement.
Tight framing without visible body
Initial test used a close-up shot showing only my face and upper shoulders. Kling struggled to track motion because arms and torso were cut off.
Output showed warping around the edges and inconsistent movement.
Lesson: Frame yourself with half-body (waist up) or full-body visible. Motion tracking needs to see shoulders, arms, and torso movement.
Why this workflow works
The two-tool combination separates appearance transformation from motion transfer.
Nano Banana handles the visual transformation. Takes your screenshot and generates a character sitting in your exact spot with matching lighting and background. Unlimited iterations mean you can refine the character appearance until perfect.
Kling Motion Control handles the motion transfer. Takes your video movements and applies them to the character image. This preserves your timing, gestures, facial expressions, and speaking patterns.
Doing these steps separately gives you control over both elements. Perfect the character appearance first. Then commit credits to motion generation only when the image is exactly right.
Learning curve and credit budget
First project took 90 minutes. Expected failures: Home Alone rejection, Joey reverse test, tight framing issues.
Second project took 45 minutes. Saved prompts from first attempt. Knew which tool settings worked. Understood framing requirements.
By the third project, character transformations take 30 minutes.
Kling provides 3,000 credits monthly. Each 8-second transformation costs approximately 140 credits.
One five-character project uses 700 credits. That's 23% of monthly allocation. You can create four similar projects per month. Or 21 individual character transformations.
Generate character images first in Nano Banana. Refine until perfect using the free tier or unlimited Pro iterations. THEN commit Kling credits for motion transfer. This prevents wasting credits on imperfect character appearances.
Kids' engagement and learning outcomes
Tested with kids ages 6 and 8. Both fully engaged throughout the reveal process.
The 6-year-old focused on recognizing characters. "That's Mario!" "That's you as Homer!" Pure visual excitement.
The 8-year-old asked deeper questions. "How does the computer know what Messi looks like?" "Can you turn into any character?" "Why did your mouth move the same way?"
This sparked discussions about AI training data, motion tracking technology, and the difference between appearance and movement.
Follow-up activity: The 8-year-old drew pictures of other characters she wanted to see (Elsa from Frozen, Spider-Man, a dragon). We're planning the next transformation session based on her ideas.
Getting the most out of these tools
Before you start:
- Choose characters together with your kids to build excitement
- Set up your recording space with consistent lighting (overhead light plus one desk lamp works well)
- Test your camera framing by recording a 3-second clip first
- Make a list of 3-5 characters before recording your A-roll
During the process:
- Generate all character images in Nano Banana BEFORE moving to Kling
- Review each character image carefully. Check background matching, lighting consistency, position accuracy.
- Start with one character transformation as a test before committing credits to all five
- Save your working prompts in a note file for future projects
What I'd do differently:
- Skip the Home Alone scene experiment (learned the 3-second minimum requirement the hard way)
- Start with cartoon characters first (Homer, Mario) before attempting photorealistic transformations
- Record the kids' reactions on video during the first reveal (their faces were priceless)
- Create a simple compiled video showing all transformations in sequence
Platform comparison
- Pros: Unlimited iterations on Pro plan, free tier available for testing, excellent at maintaining background consistency, fast generation times (2-3 minutes per image)
- Cons: Requires separate subscription, learning curve for optimal prompt writing
- Best for: Creating character appearance transformations before committing to video generation
- Pros: Preserves exact motion and timing from source video, 3,000 monthly credits, works with both photorealistic and cartoon styles, no subscription required
- Cons: 140 credits per 8-second video, 8-10 minute generation time per transformation, requires 3-second minimum video length
- Best for: Applying motion to perfected character images. Use only after character appearance is finalized.
These two tools work best as a combination. Nano Banana for appearance refinement with unlimited attempts. Kling for motion transfer only when images are perfect.
Common issues and solutions
Problem: Kling rejects your video with "Video too short" error
Solution: Motion Control requires minimum 3 seconds of footage. Check your video duration before uploading. Record new footage if your clip is under 3 seconds. Avoid using short action clips from movies. Record your own longer A-roll instead.
Problem: Character image shows wrong background or different lighting
Solution: Your Nano Banana prompt doesn't emphasize environment matching strongly enough. Add "keeping the exact same background and lighting" to every prompt. Include specific environment details like "sitting at the same desk" or "same office setting." Regenerate 2-3 times if needed.
Problem: Motion tracking looks warped or distorted around edges
Solution: Your framing is too tight. Kling needs to see your shoulders, arms, and torso for proper motion tracking. Re-record your A-roll with half-body framing (waist up minimum). Ensure arms are visible when you gesture. Use full-body framing if seated in a rolling chair.
Problem: Character doesn't match your exact sitting position
Solution: Nano Banana needs clearer positioning instructions. Add "in the same position" or "sitting exactly where the person is sitting" to your prompt. Upload the first frame screenshot, not a random frame from your video. Check that reference image shows clear body position.
Problem: Running low on Kling credits mid-project
Solution: Monthly allocation is 3,000 credits. Each 8-second transformation costs approximately 140 credits. Plan for 4-5 character transformations per project maximum. Generate shorter test videos first (3-4 seconds uses fewer credits). Perfect all character images in Nano Banana BEFORE committing Kling credits. Calculate: 700 credits = one five-character project (23% of monthly allocation).
Problem: Kids recognize the character but transformation looks "off"
Solution: Your character image needs more specific visual details in the Nano Banana prompt. For cartoon characters, specify exact clothing colors ("red hat with M logo" for Mario). For photorealistic characters, mention jersey colors and team logos ("Argentina jersey" for Messi). Include style descriptions ("Disney animated style" or "photorealistic style"). Regenerate with enhanced prompts.
.webp)